Background
Another tool that I created out of necessity. My wife copied multiple photo stores that were copied from pc to laptop plus some back and forth until it all ended up on a single backup drive. In the end she created a lot of duplicates. Some of them were neatly organized in folders others were just in dump folders. I had to clean house, because I didn’t have endless space on my backup drive.
After a long search and a couple of tried out tools I came to the conclusion that none of them really met my needs, and thus Duplicate File Finder (DFF) was born.
How does it work

Finding files
The tool is quite simple to use. Simply click BROWSE FOLDER (1) or enter a valid folder path. Next click FIND (2) and your off to the races.
The tool is smart in filtering out as much false positives as it can. A few things to note about the search algorithm are:
- Files that are locked in any way will be skipped
- Empty files (files containing 0 Bytes} will be grouped together as one duplicate group
- Duplication is not measured by file name equality, only file content matters
Important! We recommend running this application only on folders that are managed by you. Don’t run it on system folders and absolutely don’t delete any files within these folders unless you know what you’re doing.
You are not required to wait until DFF is finished scanning. You can already start deleting duplicates. The duplicates are shown in the table (3). Whenever the background color alternates a new set of duplicates starts.
The AUTO SCROLL RESULT button (4) will scroll the table down when a new duplicate is added. This only does something during the search.
Below the results table a couple of counts are visible (5). In left to right order:
Duplicate groups – How many duplicate set of files there are.
Files in duplicates – Total number of files that were found to be a duplicate of another.
Total file count – All files that were found in the targeted folder and its sub folders.
Processing results
Once you have results you have a couple of ways to deal with them. First off, you can open the file to check it out by double clicking on the file in the table.
Once you have determined which of the duplicates you want to delete you can check the files that have to be deleted or you can check the files that you want to keep. After that you have the click either the REMOVE CHECKED or REMOVE UNCHECKED button to delete them. A new window will popup that shows the progress and a log of the deleted files.
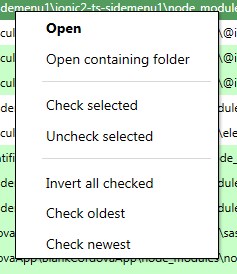
To make the selection and the analyzing a little easier there is a right click menu on the table. This menu contains the option to open the containing folder of the file that you have right clicked.
Selecting a file can be done with a left click on it. If you click another file while holding the Control key (CTRL) the file you clicked will be selected while keeping your previous selection. This way you can easily create a large selection. In de same way you can used the Shift key to select all the files between the first and second file you’ve clicked.
If you then use the context menu and click Check selected or Uncheck selected it will check or uncheck all the rows in your selection.
Finally there are some smart check options. Check oldest and check newest will select the files in each duplicated group that is either older than the newest version or newer than the oldest version. Invert selection can be used to uncheck all checked files and vice versa.
Support
If something is unclear or you have any other question, you can contact us using the contact form.